목차
WrapPanel이란?
WPF WrapPanel이란 자식 컨트롤들을 수평(Horizontal) 또는 수직(Vertical)으로 공간이 부족할 때까지 차례대로 채우는 Panel이다.
WrapPanel 사용법 및 예제
WrapPanel의 Orientation 속성의 기본 값은 수평(Horizontal)이고, 이때 자식 컨트롤은 같은 높이로 차례대로 배치된다.
Orientation 속성을 수직(Vertical) 값을 사용하면 자식 컨트롤은 같은 넓이를 차지한다.
예제1-수평 배치
Orientation 속성을 설정하지 않으면 기본 값인 Horizontal로 배치된다. 아래의 예제에서는 버튼이 첫 번째 줄에 차례대로 나열 후 Nine 버튼을 배치할 수 있는 공간이 없기 때문에 다음 줄부터 자동으로 채우게 되었다.
<Window x:Class="WrapPanelTest.MainWindow"
        xmlns="http://schemas.microsoft.com/winfx/2006/xaml/presentation"
        xmlns:x="http://schemas.microsoft.com/winfx/2006/xaml"
        Title="WrapPanel" Height="150" Width="250">
    <WrapPanel>
        <Button Content="One"></Button>
        <Button Content="Two"></Button>
        <Button Content="Three"></Button>
        <Button Content="Four"></Button>
        <Button Content="Five"></Button>
        <Button Content="Six"></Button>
        <Button Content="Seven"></Button>
        <Button Content="Eight"></Button>
        <Button Content="Nine"></Button>
        <Button Content="Ten"></Button>
    </WrapPanel>
</Window>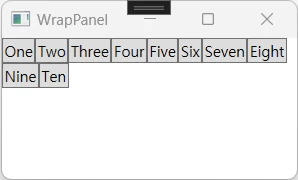
예제2-수평 배치의 높이 설정
Six 버튼의 높이를 40으로 설정하였다. 같은 열에 있는 컨트롤은 가장 큰 높이와 동일한 높이를 가진다. 아래의 예제에서는 Six버튼 높이가 가장 큰 40을 가지므로 같은 열 높이가 40에 맞춰졌다.
<Window x:Class="WrapPanelTest.MainWindow"
        xmlns="http://schemas.microsoft.com/winfx/2006/xaml/presentation"
        xmlns:x="http://schemas.microsoft.com/winfx/2006/xaml"
        Title="WrapPanel" Height="150" Width="250">
    <WrapPanel>
        <Button Content="One"></Button>
        <Button Content="Two"></Button>
        <Button Content="Three"></Button>
        <Button Content="Four"></Button>
        <Button Content="Five"></Button>
        <Button Content="Six" Height="40"></Button>
        <Button Content="Seven"></Button>
        <Button Content="Eight"></Button>
        <Button Content="Nine"></Button>
        <Button Content="Ten"></Button>
    </WrapPanel>
</Window>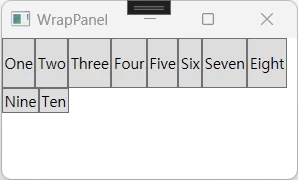
예제3-수직 배치
Orientation 속성을 Vertical로 설정하여 수직으로 배치되었다. 아래의 예제에서는 Six버튼부터 첫 번째 열에 더 이상 배치할 수 없기 때문에 다음 열부터 자동으로 채워졌다.
<Window x:Class="WrapPanelTest.MainWindow"
        xmlns="http://schemas.microsoft.com/winfx/2006/xaml/presentation"
        xmlns:x="http://schemas.microsoft.com/winfx/2006/xaml"
        Title="WrapPanel" Height="150" Width="250">
    <WrapPanel Orientation="Vertical">
        <Button Content="One"></Button>
        <Button Content="Two"></Button>
        <Button Content="Three"></Button>
        <Button Content="Four"></Button>
        <Button Content="Five"></Button>
        <Button Content="Six"></Button>
        <Button Content="Seven"></Button>
        <Button Content="Eight"></Button>
        <Button Content="Nine"></Button>
        <Button Content="Ten"></Button>
    </WrapPanel>
</Window>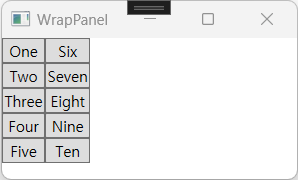
예제4-수직 배치의 넓이 설정
Six 버튼의 넓이를 60으로 설정하였다. 같은 행에 있는 컨트롤은 가장 큰 넓이와 동일한 넓이를 가진다. 아래의 예제에서는 Six버튼 넓이를 가장 큰 60을 가지므로 같은 행 넓이가 60에 맞춰졌다.
<Window x:Class="WrapPanelTest.MainWindow"
        xmlns="http://schemas.microsoft.com/winfx/2006/xaml/presentation"
        xmlns:x="http://schemas.microsoft.com/winfx/2006/xaml"
        Title="WrapPanel" Height="150" Width="250">
    <WrapPanel Orientation="Vertical">
        <Button Content="One"></Button>
        <Button Content="Two"></Button>
        <Button Content="Three"></Button>
        <Button Content="Four"></Button>
        <Button Content="Five"></Button>
        <Button Content="Six" Width="60"></Button>
        <Button Content="Seven"></Button>
        <Button Content="Eight"></Button>
        <Button Content="Nine"></Button>
        <Button Content="Ten"></Button>
    </WrapPanel>
</Window>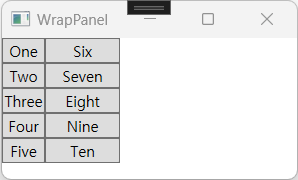
예제5-높이,넓이 설정
Orientation 속성을 Vertical로 설정하고 Six 버튼의 넓이 60, 높이 40로 하였다. Six버튼이 커지면서 Ten버튼 공간이 부족하여 다음 행으로 밀려났다.
<Window x:Class="WrapPanelTest.MainWindow"
        xmlns="http://schemas.microsoft.com/winfx/2006/xaml/presentation"
        xmlns:x="http://schemas.microsoft.com/winfx/2006/xaml"
        Title="WrapPanel" Height="150" Width="250">
    <WrapPanel Orientation="Vertical">
        <Button Content="One"></Button>
        <Button Content="Two"></Button>
        <Button Content="Three"></Button>
        <Button Content="Four"></Button>
        <Button Content="Five"></Button>
        <Button Content="Six" Width="60" Height="40"></Button>
        <Button Content="Seven"></Button>
        <Button Content="Eight"></Button>
        <Button Content="Nine"></Button>
        <Button Content="Ten"></Button>
    </WrapPanel>
</Window>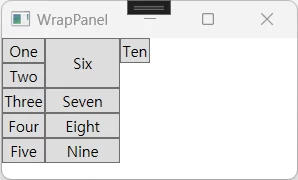

2 comments
Its like you read my mind! You appear to know so much about this, like you wrote the book in it or something. I think that you could do with some pics to drive the message home a bit, but other than that, this is excellent blog. An excellent read. I will certainly be back.
Ne’er knew this, regards for letting me know.