2.2K 


목차
Canvas란?
WPF Canvas란 좌표 값을 이용하여 자식 컨트롤러를 배치하는 방법이다. 자유롭게 컨트롤러를 배치할 때 편리하다.
Canvas 사용법 및 예제
Canvas.Top, Canvas.Left, Canvas.Right, Canvas.Bottom 속성을 사용하여 자식 컨트롤의 위치를 지정해준다. 작성된 코드 순서대로 배치되기 때문에 배치상 겹치는 부분이 발생하면 먼저 작성된 코드의 컨트롤러가 아래에 배치되고, 후에 작성된 코드의 컨트롤러가 위에 배치된다.
예제1-Canvas 기본형
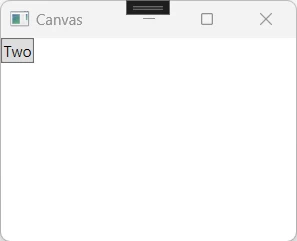
아래의 예제에서는 두 개의 버튼을 생성하였지만 하나만 보인다. 이유는 자식 컨트롤러의 위치를 지정해주지 않아 두 개의 버튼 모두 왼쪽 상단에 겹쳐서 배치되었기 때문이다. 먼저 작성된 One버튼의 컨트롤러가 아래에 배치되었고 이후에 작성된 Two버튼이 위에 배치되었다.
XAML
<Window x:Class="Canvas.MainWindow"
        xmlns="http://schemas.microsoft.com/winfx/2006/xaml/presentation"
        xmlns:x="http://schemas.microsoft.com/winfx/2006/xaml"
        Title="Canvas" Height="200" Width="250">
    <Canvas>
        <Button Content="One"/>
        <Button Content="Two"/>
    </Canvas>
</Window>
예제2-위치 속성 사용
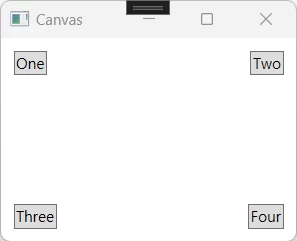
Canvas.Top, Canvas.Left, Canvas.Right, Canvas.Bottom 속성을 사용하여 Canvas 내에서 자식 컨트롤러의 픽셀 위치를 지정하였다. 각 속성 값은 상위 Panel의 Top, Left, Right, Bottom에서 떨어진 픽셀만큼 표시된다.
XAML
<Window x:Class="Canvas.MainWindow"
        xmlns="http://schemas.microsoft.com/winfx/2006/xaml/presentation"
        xmlns:x="http://schemas.microsoft.com/winfx/2006/xaml"
        Title="Canvas" Height="200" Width="250">
    <Canvas>
        <Button Content="One" Canvas.Top="10" Canvas.Left="10"/>
        <Button Content="Two" Canvas.Top="10" Canvas.Right="10"/>
        <Button Content="Three" Canvas.Bottom="10" Canvas.Left="10"/>
        <Button Content="Four" Canvas.Bottom="10" Canvas.Right="10"/>
    </Canvas>
</Window>
예제3-Z Index사용
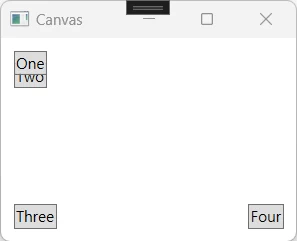
Canvas내에 자식 컨트롤러가 겹친다면 상단에 보여줄 컨트롤러의 우선 순위를 정해주는 것이 좋다. Panel.ZIndex 속성을 사용하여 상단에 보여줄 컨트롤러의 우선순위를 정할 수 있다. Panel.ZIndex값은 Int형태이고 Int값이 클 수록 더 상단에 배치된다.
XAML
<Window x:Class="Canvas.MainWindow"
        xmlns="http://schemas.microsoft.com/winfx/2006/xaml/presentation"
        xmlns:x="http://schemas.microsoft.com/winfx/2006/xaml"
        Title="Canvas" Height="200" Width="250">
    <Canvas>
        <Button Content="One" Canvas.Top="10" Canvas.Left="10" Panel.ZIndex="1"/>
        <Button Content="Two" Canvas.Top="20" Canvas.Left="10" Panel.ZIndex="0"/>
        <Button Content="Three" Canvas.Bottom="10" Canvas.Left="10"/>
        <Button Content="Four" Canvas.Bottom="10" Canvas.Right="10"/>
    </Canvas>
</Window>
